Getting through the eski mavi beyaz BIOS Windows 10 kurma process may seem hard, but with the right steps, it can be simple. Whether you’re working on an old system or trying to upgrade, understanding the BIOS settings is key. At VistaGlimpse, we want to make it easy for you to install Windows 10 using the old blue and white BIOS.
In this guide, we will walk you through the eski mavi beyaz BIOS Windows 10 kurma process, step by step. No need to worry about complicated terms—everything is explained in simple, easy-to-understand language. With this guide, you’ll be ready to upgrade and enjoy all the benefits of Windows 10 on your legacy system.
What Is Eski Mavi Beyaz BIOS and Why Does It Matter for Windows 10?
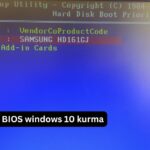
The eski mavi beyaz BIOS Windows 10 kurma is an older version of the BIOS (Basic Input/Output System) used in older computers. Recognized by its simple blue and white interface, this type of BIOS is still present in many older machines. While most modern systems now rely on UEFI (Unified Extensible Firmware Interface), it is important to understand how eski mavi beyaz BIOS functions, especially when installing Windows 10 on older hardware.
In older systems, BIOS plays a critical role in managing how your computer starts up and communicates with different components, such as the hard drive, keyboard, and display. It is the bridge that allows the computer to initialize properly and load an operating system like Windows 10. At VistaGlimpse, we emphasize the importance of understanding this older technology to keep older systems running efficiently.
Although most new computers come with UEFI, eski mavi beyaz BIOS Windows 10 kurma still works with Windows 10, but it may require additional steps. Due to its limitations, like slower boot times and smaller hard drive support, configuring BIOS correctly is important for smooth performance when upgrading to Windows 10.
Simple Steps to Begin Eski Mavi Beyaz BIOS Windows 10 Kurma
Starting the process of eski mavi beyaz BIOS Windows 10 kurma can be easy if you know the steps. First, ensure that you have a bootable USB with the Windows 10 installation files ready. It’s essential to check whether your system meets the minimum requirements to run Windows 10, such as having enough RAM and storage space. At VistaGlimpse, we suggest double-checking these details before you begin.
Once you have everything in place, restart your computer and access the eski mavi beyaz BIOS by pressing a key like F2 or DEL during startup. In the BIOS menu, navigate to the boot settings and change the boot order so that your system starts from the USB drive. This step is necessary for the installation to proceed.
After configuring the BIOS, restart your system, and it should boot from the USB drive. The Windows 10 setup screen will appear, and you can begin installing the new operating system. These steps make the eski mavi beyaz BIOS Windows 10 kurma simple and effective.
Preparing Your Computer for Eski Mavi Beyaz BIOS Windows 10 Installation
Before starting the eski mavi beyaz BIOS Windows 10 kurma, it’s crucial to prepare your computer properly. Preparation helps avoid unexpected problems and ensures a smooth installation process. The first step is to confirm that your system meets the minimum requirements for Windows 10. This includes having enough RAM, a processor that is 1 GHz or faster, and sufficient storage space for the operating system.
Next, it’s a good idea to back up any important files. Installing a new operating system could wipe your data, so using an external drive or cloud storage to save your documents, photos, and other data is essential. At VistaGlimpse, we always remind users to back up files before making significant changes to their computers.
Once your backup is complete, you’ll need to create a bootable USB drive with the Windows 10 installation files. You can easily do this using the official Windows Media Creation Tool. After preparing the USB, you’re ready to start the eski mavi beyaz BIOS Windows 10 kurma process.
Why Use Legacy BIOS for Installing Windows 10? A Quick Overview

The eski mavi beyaz BIOS Windows 10 kurma process is important for older computers that still rely on legacy BIOS rather than UEFI. One key reason to use legacy BIOS is that many older systems are not compatible with UEFI. For these systems, eski mavi beyaz BIOS provides a stable environment for installing and running Windows 10.
Legacy BIOS is simpler to use, making it easier to configure and troubleshoot. It doesn’t include advanced features like Secure Boot, which can sometimes make the installation process more complex. If you’re using older hardware, sticking with BIOS can save time and prevent compatibility issues.
However, legacy BIOS does have limitations, such as slower boot times and limited support for large hard drives. Even with these restrictions, many users find that eski mavi beyaz BIOS Windows 10 kurma is still the best choice for their older systems, allowing them to enjoy the features of Windows 10 without upgrading the firmware.
How to Create a Bootable USB for Eski Mavi Beyaz BIOS Windows 10 Kurma
To install Windows 10 on a system with eski mavi beyaz BIOS, you will need a bootable USB drive. Creating a bootable USB is straightforward and can be done using a few tools. You’ll need a USB drive with at least 8 GB of storage and the Windows 10 installation files, which can be downloaded from Microsoft’s website.
The easiest way to create a bootable USB is by using the Windows Media Creation Tool. After downloading the tool, insert your USB drive into your computer and run the program. Select “Create installation media for another PC” and follow the steps to choose the correct version of Windows 10 for your system. Once you have completed these steps, the tool will create the bootable USB for you.
Before using the USB in your eski mavi beyaz BIOS Windows 10 kurma, it’s important to test the drive by booting from it on another computer. This ensures that the USB is working properly and is ready for the installation.
Changing BIOS Settings: Making Windows 10 Work on Legacy Systems
Changing your BIOS settings is a necessary step in the eski mavi beyaz BIOS Windows 10 kurma process. These settings allow your computer to recognize and boot from the USB drive that contains the Windows 10 installation files. The first setting you’ll need to adjust is the boot order.
When you access the eski mavi beyaz BIOS interface (usually by pressing F2, DEL, or ESC during startup), look for the boot options menu. Here, you should move the USB drive to the top of the boot list. This ensures that the computer will start from the USB rather than the hard drive. If this step isn’t done, the computer may continue to boot from the existing operating system, and the installation won’t begin.
Additionally, check if legacy boot support is enabled. Some older systems may require this setting to recognize and boot from the USB drive. Once these adjustments are made, save your changes, restart the computer, and proceed with the Windows 10 installation.
Troubleshooting Common Issues During Eski Mavi Beyaz BIOS Windows 10 Kurma
Sometimes, problems arise during the eski mavi beyaz BIOS Windows 10 kurma process, but most issues can be resolved with a few troubleshooting steps. One common problem is the system not recognizing the bootable USB drive. This often happens if the boot order in BIOS is not set correctly. Double-check that the USB drive is at the top of the boot list.
If the installation freezes or takes a long time, it might be due to compatibility issues. Verify that your hardware meets the minimum system requirements for Windows 10 and that all components are functioning properly. You might also need to check that your USB drive is not corrupted and has been created correctly.
At times, the system might throw up errors, such as missing drivers or partitions not showing up. Recreating the bootable USB or resetting the BIOS settings to default can often resolve these problems. With a bit of patience and the right troubleshooting steps, you can overcome most issues during the eski mavi beyaz BIOS Windows 10 kurma process.
Easy Guide to Configuring BIOS for a Smooth Windows 10 Install

Configuring the BIOS settings correctly is essential for a smooth eski mavi beyaz BIOS Windows 10 kurma. After accessing the BIOS menu, the first thing to do is set the boot order. This allows your computer to boot from the USB drive that contains the Windows 10 installation files. Without this, your computer might continue booting from the hard drive, which will prevent the installation from starting.
Next, enable legacy support if your BIOS has this option. Older systems typically need this feature to boot from external devices like USB drives. Disabling Secure Boot may also be necessary if your system has this feature, as it is more commonly found in UEFI systems.
Once these settings are in place, save your changes and exit the BIOS. The system will restart and boot from the USB drive, allowing the Windows 10 installation to begin. By following these simple steps, you can ensure that your eski mavi beyaz BIOS Windows 10 kurma goes smoothly.
How to Enable Legacy Boot Mode for Eski Mavi Beyaz BIOS Windows 10 Kurma
Enabling legacy boot mode is crucial for older systems using the eski mavi beyaz BIOS Windows 10 kurma process. Legacy boot mode allows the computer to boot from older hardware interfaces, such as BIOS, instead of the newer UEFI standard. This setting is important because it ensures compatibility with your older system’s components.
To enable legacy boot mode, first, restart your computer and access the BIOS setup menu by pressing a key like F2, DEL, or ESC during startup. Once inside the BIOS, navigate to the boot options section. Here, you should find an option for enabling legacy support or boot mode.
Once legacy boot mode is enabled, save the settings and restart the computer. The system should now be able to boot from the USB drive with Windows 10 installation files, allowing the installation to proceed. By enabling this mode, you can ensure a successful eski mavi beyaz BIOS Windows 10 kurma.
Understanding the Differences Between Legacy BIOS and UEFI for Windows 10
The eski mavi beyaz BIOS Windows 10 kurma process is based on legacy BIOS, but how does it differ from UEFI? Legacy BIOS, which has been in use for decades, operates in 16-bit mode and has several limitations, such as slower boot times and smaller hard drive support. UEFI, on the other hand, is a more modern system that operates in 32-bit or 64-bit modes and offers advanced features like faster boot times, secure boot, and support for large hard drives.
Another key difference between these two is the user interface. While the eski mavi beyaz BIOS Windows 10 kurma typically has a basic blue and white, text-only interface, UEFI offers a more graphical interface that’s easier for most users to navigate. This makes UEFI more user-friendly, especially for people who aren’t familiar with technical computer terms.
Despite its simplicity, legacy BIOS remains essential for older systems. Many users still rely on it for installing Windows 10, especially on computers that cannot support UEFI. While UEFI is the industry standard for new devices, the eski mavi beyaz BIOS Windows 10 kurma process is still important for keeping older machines running.
Step-by-Step Guide to Completing Eski Mavi Beyaz BIOS Windows 10 Setup
The eski mavi beyaz BIOS Windows 10 kurma is a straightforward process when you follow the right steps. Once your bootable USB drive is ready and you’ve configured your BIOS settings to boot from the USB, the installation can begin. When the system boots from the USB, you’ll see the Windows 10 setup screen.
First, select your preferred language, time zone, and keyboard layout. Click “Next” and then “Install Now.” You’ll be prompted to enter a product key, which you can do if you have one, or you can skip this step and enter it later. After that, choose the custom installation option, which allows you to select where Windows 10 will be installed.
Select the drive where you want to install Windows 10 and click “Next.” The installation process will now begin. Your computer may restart several times during this process, which is completely normal. Once the installation is complete, you’ll be asked to set up a user account and configure your preferences, like privacy settings. After finishing the setup, you can start using Windows 10 on your eski mavi beyaz BIOS Windows 10 kurma system.
Solving Installation Problems: What to Do When BIOS Won’t Load Windows 10

If your eski mavi beyaz BIOS Windows 10 kurma system won’t load the Windows 10 installation, don’t worry—there are several troubleshooting steps you can take. First, check that the USB drive is properly set as the primary boot device in the BIOS settings. If it isn’t, the system will try to boot from the hard drive instead of the USB.
If the USB drive isn’t recognized, try using a different port or recreate the bootable USB drive using the Windows Media Creation Tool. Sometimes, issues with the USB drive can cause installation problems. At VistaGlimpse, we always recommend testing the USB drive on another computer to make sure it’s functioning correctly.
If the system still won’t load the Windows 10 setup, there might be a problem with the hardware. Check that your computer meets the minimum requirements for Windows 10 and that all components are in good condition. Resetting the BIOS settings to default can also help resolve certain issues. By following these troubleshooting tips, you can get past most problems during the eski mavi beyaz BIOS Windows 10 kurma.
Speeding Up Boot Time After Eski Mavi Beyaz BIOS Windows 10 Kurma
After completing the eski mavi beyaz BIOS Windows 10 kurma, you may notice that your computer takes longer to boot compared to newer systems. There are a few things you can do to speed up the boot process. First, return to the BIOS settings and adjust the boot order. Removing unnecessary devices from the boot sequence will make the computer start up faster.
Another helpful tip is to disable startup programs in Windows 10. Many programs automatically launch when the system starts, which slows down the boot process. You can manage these programs by opening the Task Manager and navigating to the Startup tab. From there, you can disable any programs you don’t need right away.
Lastly, make sure that your system drivers and BIOS firmware are updated. Regular updates improve performance and can reduce boot times. By following these steps, you can optimize your computer for faster boot times after completing the eski mavi beyaz BIOS Windows 10 kurma process.
How to Keep Your Eski Mavi Beyaz BIOS Updated for Better Performance
Maintaining your eski mavi beyaz BIOS Windows 10 kurma is essential for keeping your system running smoothly. Even though this is an older BIOS version, updating it ensures that your hardware remains compatible with modern software like Windows 10. To check for BIOS updates, visit the manufacturer’s website and search for your computer model.
Once you find the correct BIOS update, download it to a USB drive. Enter the BIOS setup on your computer and follow the instructions provided by the manufacturer to install the update. Be careful during this process—interruptions or incorrect installation could cause issues with your system.
Regularly checking for BIOS updates and applying them when needed will improve your system’s performance. Even older computers can benefit from these updates, helping them stay compatible with newer programs and operating systems. At VistaGlimpse, we always recommend keeping your BIOS up to date for the best performance, even when using eski mavi beyaz BIOS.
Is Upgrading to UEFI Worth It After Using Eski Mavi Beyaz BIOS?
Many users wonder if upgrading from eski mavi beyaz BIOS to UEFI is worth it. UEFI is the newer firmware standard that offers faster boot times, enhanced security features, and better support for larger hard drives. However, upgrading to UEFI isn’t always necessary, especially if your system is running well with legacy BIOS.
Not all older systems support UEFI, so upgrading may not be an option. Even if your system does support UEFI, the upgrade process can be risky and complicated. For many users, sticking with eski mavi beyaz BIOS is a simpler and safer choice, especially if your system is performing well.
If security and performance are top priorities, and your system supports UEFI, then upgrading might be worth considering. But for most users with older systems, the eski mavi beyaz BIOS Windows 10 kurma works just fine. It provides stable performance and allows you to continue using your computer without major changes.
Conclusion
Installing Windows 10 using the eski mavi beyaz BIOS may seem difficult, but with the right steps, it becomes simple. By preparing your computer, adjusting the BIOS settings, and using a bootable USB, you can upgrade your old system easily. Even though this process uses older technology, it can still help you run modern software like Windows 10 on your computer.
While UEFI is more advanced, eski mavi beyaz BIOS is still helpful for older systems. It keeps your computer working, even if it’s not brand new. By following the steps in this guide, you can enjoy Windows 10 and improve the performance of your old system without needing to buy new hardware. Keep your BIOS updated, and your system will keep running smoothly.
You Should Know: Movieda2023.com
FAQs
Q: What is Eski Mavi Beyaz BIOS used for?
A: The eski mavi beyaz BIOS is an older system interface that helps the computer start up and controls how it communicates with the hardware, like the hard drive and keyboard.
Q: Can I install Windows 10 on a computer with Eski Mavi Beyaz BIOS?
A: Yes, you can install Windows 10 on a system with eski mavi beyaz BIOS. You just need to prepare a bootable USB and adjust some settings in the BIOS.
Q: How do I make a bootable USB for Eski Mavi Beyaz BIOS?
A: To make a bootable USB, download the Windows Media Creation Tool, plug in a USB drive, and follow the steps to create the installation media for Windows 10.
Q: What’s the difference between Legacy BIOS and UEFI?
A: Legacy BIOS is an older firmware system, while UEFI is newer and has more features like faster boot times and better security options. UEFI also supports larger hard drives.
Q: How do I get into Eski Mavi Beyaz BIOS settings?
A: You can access the eski mavi beyaz BIOS by pressing keys like F2, DEL, or ESC when your computer is starting up.
Q: What do I do if the USB drive isn’t booting?
A: Make sure the USB is set as the first boot device in the BIOS. If that doesn’t work, try recreating the USB or check the USB port.
Q: Is it necessary to upgrade to UEFI if I’m using Eski Mavi Beyaz BIOS?
A: No, upgrading to UEFI is not required if your system works well with the eski mavi beyaz BIOS. But UEFI offers faster performance and security on newer systems.